Your IFAK is Wrong
Jun 04, 2026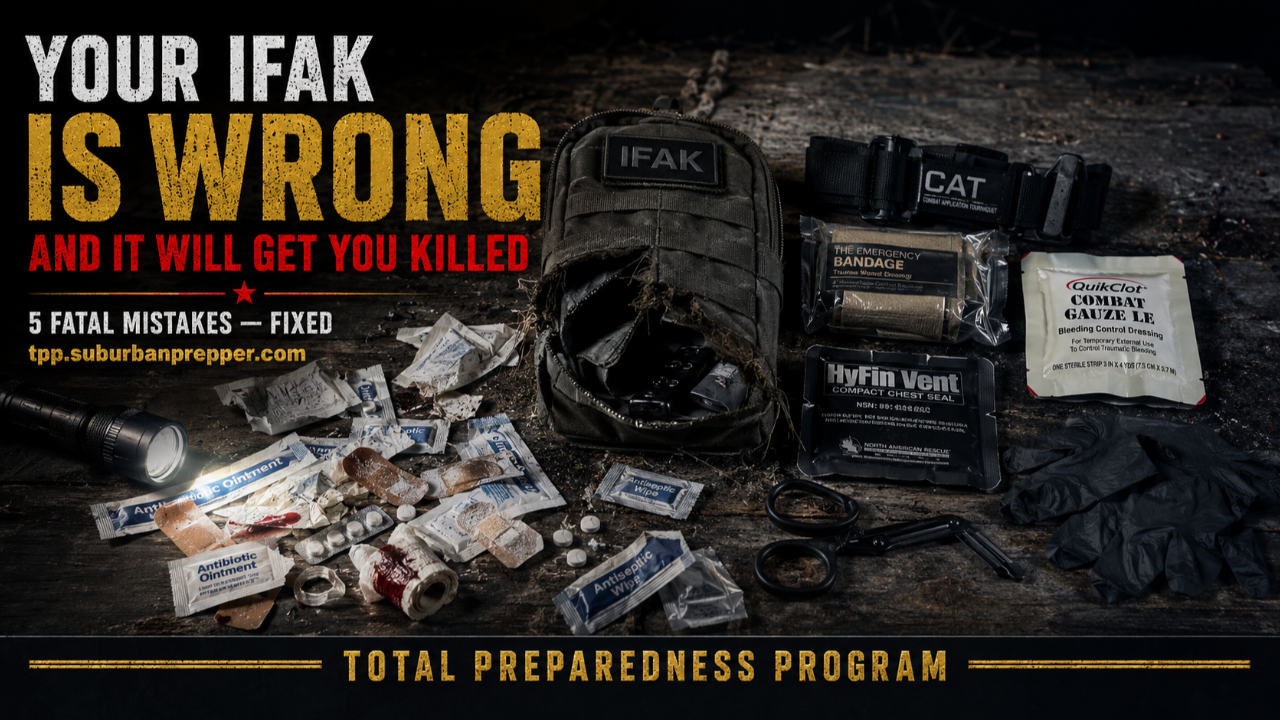
What to Put in an IFAK — The Complete Guide
By Suburban Prepper
Most people who own an Individual First Aid Kit have it wrong.
Not because they bought bad gear. Not because they do not care. But because nobody ever told them what an IFAK is actually for — and what it is absolutely not for.
This guide fixes that. By the time you finish reading you will know exactly what belongs in a properly built IFAK, what needs to come out, why the difference matters, and what it takes to actually be ready to use the kit when everything else has failed.
One critical point before we go any further. Everything in this guide is written for true SHTF scenarios — situations where the grid is down, professional medical help is not coming, and you are the last line of defense between someone you love and death. This is not everyday first aid. This is not a substitute for calling 911. This is doctrine for the worst day of your life when normal systems have completely and catastrophically failed. In any situation where professional medical care is accessible — use it. Period. Full stop. No exceptions.
Understanding the Threat — Why Trauma Kills
Before we build the kit we need to understand what we are building it to fight.
Traumatic injury kills through a predictable and well-documented sequence of physiological events. Understanding that sequence is the foundation of everything that follows.
The leading cause of preventable death in trauma is massive hemorrhage — uncontrolled bleeding. The human body contains approximately five liters of blood. Loss of 15 percent — less than one liter — produces the first signs of hemorrhagic shock. Loss of 30 percent produces serious physiological compromise. Loss of 40 percent or more is rapidly fatal without immediate intervention. And the window between injury and death from uncontrolled hemorrhage is measured in minutes — not hours.
The average 911 response time in most US cities is eight to twelve minutes. In a true SHTF scenario where the grid is down and emergency services are overwhelmed or non-existent that response time becomes infinite. The three to five minute window in which a life-threatening bleed can be addressed by a bystander is the entire margin between survival and death.
The second leading cause of preventable trauma death is airway compromise and chest injury — specifically tension pneumothorax, the condition where air accumulates in the chest cavity, collapses a lung, and eventually compresses the heart and great vessels to the point of cardiovascular collapse. This is a rapidly fatal condition — minutes, not hours — and it is completely treatable with the right equipment and the right training.
The third preventable killer is hypothermia in the context of trauma — the combination of blood loss, shock, and environmental cold that drives core body temperature below functional levels and dramatically worsens the coagulopathy — the failure of blood to clot — that is already occurring from the trauma itself. The trauma triad of death — hypothermia, acidosis, and coagulopathy — is a self-reinforcing cascade that rapidly becomes irreversible without intervention.
Your IFAK is built to address these three killers. Everything else is secondary.
What Is an IFAK?
An IFAK — Individual First Aid Kit — is not a general purpose first aid kit. It is not a boo-boo kit. It is not the place for band-aids, antiseptic wipes, blister pads, or painkillers.
An IFAK is a dedicated trauma kit. Its one and only purpose is to be used on you, by a buddy, to stop you from dying from the big three — massive bleeding, a collapsed lung, or profound shock.
That is the entire mission. Nothing else.
The moment you add anything that does not directly address one of those three threats you have compromised your kit. You have turned a life-saving system into a junk drawer — and in a real emergency that junk drawer will get someone killed.
Here is why this matters more than most people realize. In the chaos of a real trauma emergency — gunshot, vehicle accident, structural collapse, blast injury — the person trying to save your life is operating under extreme stress, possibly in low light, possibly with their own hands shaking, possibly with adrenaline flooding their system and fine motor skills compromised. They do not have time to sort through your kit. They do not have time to identify what is useful and what is not. Every second they spend digging past blister pads and antibiotic ointment is a second you are bleeding.
A lean, organized, memorized IFAK means your buddy goes from injury to intervention in seconds. A cluttered IFAK means they waste critical time — and you pay for it.
The Two Kit Rule
Before we talk about what goes in your IFAK we need to establish the two kit rule — the foundational organizational principle that every serious preparedness practitioner follows.
Get two kits.
Kit one is your ouch pouch — your general purpose first aid kit. Fill it with everything you want for everyday use. Band-aids in multiple sizes, antibiotic ointment, antiseptic wipes, pain relievers, blister pads, moleskin, a digital thermometer, antihistamines, antacid, elastic bandages, SAM splints. This kit handles the overwhelming majority of injuries you will actually encounter in daily life and in a preparedness scenario — cuts, blisters, sprains, minor burns, headaches, and all the small medical challenges that are not life threatening but need to be addressed.
Keep your ouch pouch in your vehicle, your main pack, or your home medical station. It is the kit you use ninety-nine percent of the time.
Kit two is your IFAK. Life-saving gear only. Lean, focused, organized, and memorized. Every item in it has exactly one job — keeping you alive long enough for definitive medical care to reach you or for you to reach it. In a true SHTF scenario that may be a very long time. The IFAK buys you that time.
These two kits never mix. Not a single item crosses from the ouch pouch to the IFAK. The discipline of keeping them completely separate is part of the system — because in an emergency your buddy does not grab your ouch pouch looking for trauma supplies. They grab your IFAK and they know exactly what they will find.
What Goes in an IFAK — The Complete Non-Negotiable List
Tourniquets — The First Line Against Hemorrhagic Death
The tourniquet is the single most important item in your IFAK and one of the most important medical advances in modern combat medicine. Military data from the conflicts in Iraq and Afghanistan — where tourniquet use became standard TCCC protocol — demonstrated a dramatic reduction in limb loss and death from extremity hemorrhage when properly applied tourniquets were used early and correctly. The old myth that tourniquets cause limb loss has been definitively disproven by decades of military medical data. Properly applied tourniquets save limbs by saving lives.
You need real TCCC approved tourniquets — not the cheap knockoffs from unknown Amazon sellers that look identical to the real thing but are made from inferior materials that fail under the tensile loads of actual application. The difference between a real CAT tourniquet and a counterfeit is invisible until you apply it — and then it is immediately, catastrophically apparent.
The gold standard options are the CAT — Combat Application Tourniquet — the SOFTT-W — Special Operations Forces Tactical Tourniquet Wide — and the SAM XT. The CAT is the most widely used tourniquet in the US military and law enforcement and its one-handed application design makes it the preferred option for self-application. The SOFTT-W has a wider strap that distributes pressure more evenly — preferred by some operators for large limb applications. The SAM XT is the newest generation and incorporates several design improvements over both predecessors.
Buy from verified suppliers — Med-Tac, North American Rescue, Rescue Essentials. Know your source.
You have four limbs. You need at minimum four tourniquets accessible on your person or kit — one for each limb — plus a fifth tourniquet used exclusively for training. Do not ever use your carry tourniquets for training. Repeated application degrades the windlass mechanism and the buckle system. Your carry tourniquets are for emergencies only. Your training tourniquet is clearly marked as such.
The application protocol — two to three inches above the wound, never on a joint, tighten the windlass until the bleeding stops and the distal pulse is absent, secure the windlass, write the time of application on the tourniquet or on the patient's skin with a permanent marker. The time of application is critical clinical information. Do not skip it.
For junctional wounds — injuries to the groin, armpit, neck, and other areas where a standard limb tourniquet cannot be placed — you need a junctional tourniquet. The JAKTM — Junctional Emergency Treatment Tool — and the SAM Junctional Tourniquet are the primary options. Junctional wounds are among the most lethal injury patterns in trauma because they cannot be addressed with a standard tourniquet and they are anatomically located adjacent to the major vascular structures that bleed fastest. Carry one junctional tourniquet for use and one for training.
Hemostatic Gauze — Controlling the Bleed That Cannot Be Tourniqueted
For wounds that cannot be tourniqueted — deep penetrating wounds to the neck, chest, abdomen, and junctional areas — wound packing with hemostatic gauze is the intervention that bridges the gap between injury and definitive care.
The wound packing protocol is straightforward but requires practice to perform correctly under stress. Glove up first — your safety matters. Pack the wound tightly with hemostatic gauze starting at the deepest point of the wound cavity and working outward — the gauze needs to be in direct contact with the bleeding vessel, not just filling the wound entrance. Apply firm, sustained manual pressure for a minimum of three minutes — do not remove the packing once it is in place. The hemostatic agent needs time and sustained pressure to activate and form a stable clot.
The two gold standard hemostatic gauze options are QuikClot Combat Gauze and Celox Gauze.
QuikClot Combat Gauze uses kaolin — a naturally occurring mineral — to activate Factor XII in the body's intrinsic clotting cascade. It triggers the body's own clotting mechanism from within the wound, accelerating a process that would normally take much longer to produce a stable clot. QuikClot is the current standard in US military TCCC protocol — faster activation, extensive military data supporting its effectiveness, and lower cost than competing options.
Celox Gauze uses chitosan — derived from shrimp shells — as its active hemostatic agent. Chitosan works through a completely different mechanism than QuikClot — it binds directly to red blood cells and platelet membranes to form a gel-like clot that is independent of the body's clotting cascade. This is the critical advantage of Celox — it works even when the normal clotting cascade is impaired. Patients on anticoagulant medications — warfarin, Xarelto, Eliquis, Pradaxa — have a compromised clotting cascade and QuikClot's mechanism may be significantly less effective in these patients. Celox bypasses the cascade entirely and produces a clot through a direct physical mechanism. If anyone in your household or group is on anticoagulant therapy carry Celox.
Both agents come in gauze form for wound packing and in granule or powder form. Always use the gauze form for wound packing. Never pour granules directly into a deep wound — the granules cannot be adequately controlled or removed and the gauze form produces far superior results. Both require firm, sustained pressure after application — the hemostatic agent needs time to work.
In addition to hemostatic gauze carry at minimum three emergency trauma dressings — the Israeli bandage or Emergency Bandage — for applying sustained direct pressure to wounds. The Israeli bandage's pressure applicator bar is its defining feature — it maintains consistent mechanical pressure on the wound without requiring the rescuer to maintain continuous manual pressure, freeing their hands for other interventions. Get a fourth Israeli bandage for training and practice. Carry at minimum two rolls of standard compressed gauze as a backup wound packing option and for securing other dressings.
Chest Seals — Managing Penetrating Chest Trauma
Penetrating chest trauma — a gunshot wound, stab wound, or impalement to the chest — creates a sucking chest wound if the injury penetrates the chest wall. Air flows through the wound with each breath, accumulating in the pleural space and progressively collapsing the lung. If untreated this progresses to a tension pneumothorax — air under pressure in the chest cavity that compresses the mediastinum, shifts the heart and great vessels away from the midline, and produces cardiovascular collapse. Tension pneumothorax is uniformly fatal without treatment. With treatment — chest seal and needle decompression when indicated — it is entirely survivable.
The treatment for an open chest wound is a vented chest seal applied to both the entry wound and the exit wound if one is present. Vented chest seals allow air to escape from the chest cavity on exhalation while preventing air from entering on inhalation — they address the immediate problem of a sucking chest wound while allowing for pressure equalization. The Hyfin Vent Compact and the HyFin Vent Chest Seal Twin Pack are the current standard options.
Carry a minimum of two chest seals — one for entry and one for exit — but four is better. Not every penetrating chest wound has an exit wound, but some do, and in the chaos of a real trauma assessment you may not immediately identify all wounds. Four seals ensure you have coverage regardless of injury pattern.
One absolutely critical point from real-world experience — vented chest seals do not adhere well to sweaty, bloody, hairy, or dirty skin. The adhesive that creates the seal between the chest wall and the seal itself depends on skin contact — and any barrier between the seal and the skin compromises that contact. Pack a small super absorbent towel in your kit specifically to wipe the wound area dry, clean, and as clear of hair as possible before applying the seal. This single preparatory step dramatically improves seal performance and is the difference between a functional chest seal and one that peels off the moment the patient moves.
Needle Decompression — The Advanced Intervention That Requires Real Training
This section requires more attention and more serious consideration than any other section in this guide. Read it carefully. Read it more than once.
Needle decompression — the insertion of a large bore needle and catheter into the chest wall to relieve a tension pneumothorax — is an advanced, invasive medical procedure. It is the most technically demanding intervention in the TCCC protocol. And it is the intervention that is most frequently misunderstood, misapplied, and dangerously misused by people who have the equipment but not the training.
Let me be completely and unambiguously direct about this. Inserting a needle into someone's chest without proper formal training, proper certification, ongoing maintained proficiency, and the clinical judgment to correctly identify the indication for the procedure can kill that person faster and more certainly than the tension pneumothorax you are attempting to treat.
An incorrectly placed needle — wrong intercostal space, wrong landmark, wrong angle — can lacerate the intercostal neurovascular bundle producing significant hemorrhage. It can penetrate the lung parenchyma itself, worsening respiratory compromise. It can introduce infection into the pleural space, producing an empyema. It can lacerate a major pulmonary vessel, producing a hemothorax that is far more immediately life threatening than the tension pneumothorax it was supposed to treat. In the hands of someone who does not know what they are doing this procedure is not a life-saving intervention — it is an additional lethal injury on top of the existing one.
This is not a procedure you learn from a YouTube video. This is not a procedure you carry capability for because you took a one-time course two years ago and have not practiced since. This is not a procedure you attempt because you have the needle in your kit and you read about it on a preparedness forum.
Needle decompression capability belongs in your IFAK only if you meet all three of the following requirements without exception. First — you have completed a formal Tactical Combat Casualty Care course or equivalent medical training program that includes supervised, hands-on needle decompression training using anatomical simulators or cadaver laboratory sessions. Reading about the procedure is not training. Watching a video is not training. Hands-on supervised practice under qualified instruction is training. Second — you maintain your proficiency through regular, ongoing, supervised practice. Medical skills degrade with disuse. A TCCC course completed two years ago with no subsequent practice does not produce proficiency — it produces a vague memory of a procedure that the stress of a real emergency will further degrade. Skill maintenance is not optional. Third — you possess the clinical judgment to correctly identify a tension pneumothorax under the stress of a real emergency — to distinguish it from other causes of respiratory deterioration, to identify the correct anatomical landmarks under field conditions, and to make the decision to intervene with appropriate confidence in your assessment.
If you do not meet all three requirements without exception — remove needle decompression capability from your IFAK entirely. A chest seal applied correctly to a penetrating chest wound is within the capability of a trained layperson with proper preparation. Needle decompression is categorically not.
For those who are trained, certified, and maintaining ongoing proficiency — carry six 14 gauge needles and catheters specifically designed for needle decompression. Why six? Because a lung can reinflate after successful decompression, requiring a second attempt. Because you may have bilateral chest injuries requiring decompression on both sides. Because in the chaos of a field emergency a needle can kink, clog, or be displaced. Six gives you options when the first one does not produce the expected result. Carry an additional set of needles for training purposes only — never practice with your carry needles.
The anatomical landmark for needle decompression is the second intercostal space at the midclavicular line on the affected side — or alternately the fourth or fifth intercostal space at the anterior axillary line, which is increasingly preferred in current TCCC guidance as it avoids the major vessels that can be encountered at the traditional landmark. The needle is inserted perpendicular to the chest wall, just superior to the rib to avoid the neurovascular bundle that runs along the inferior rib margin, until a rush of air indicates successful decompression.
This description is educational context — not procedural instruction. If the above paragraph does not make complete anatomical and clinical sense to you based on your training — you are not ready to carry this intervention.
Trauma Shears
Heavy duty trauma shears — capable of cutting through clothing, webbing, seatbelts, and light leather in seconds — are the tool that allows rapid exposure of injuries for assessment and treatment. You cannot treat what you cannot see. Getting clothing off a trauma patient quickly is not a matter of convenience — it is a clinical necessity.
Stage your trauma shears on the outside of your IFAK where they can be grabbed immediately without opening the kit. They should be the very first thing your buddy's hand finds when they reach for your kit.
Nitrile Gloves
Two pairs of heavy duty nitrile gloves. Your rescuer's safety matters as much as your own. Blood borne pathogen exposure — HIV, hepatitis B, hepatitis C — is a real and serious risk in any trauma scenario involving significant bleeding. Nitrile gloves are the first line of protection and they cost almost nothing relative to the protection they provide.
Stage one pair on the outside of the kit alongside the trauma shears. Your buddy gloves up before they go to work — this is non-negotiable protocol.
Permanent Marker
A single fine-tip permanent marker. Write the time of tourniquet application — in large, clear numbers — on the tourniquet itself or directly on the patient's skin proximate to the tourniquet. Time of application determines treatment protocol for tourniquet management — a tourniquet in place for under two hours is managed differently from one in place for longer. Even in a true SHTF scenario where professional medical handoff may be delayed, document the time. When care eventually becomes available that information matters.
Hypothermia Prevention
The trauma triad of death — hypothermia, acidosis, and coagulopathy — is a physiological cascade that dramatically worsens hemorrhagic shock and impairs the clotting process that your hemostatic agents are trying to support. A trauma patient who is cold clots poorly. A trauma patient who clots poorly continues to bleed. A trauma patient who continues to bleed becomes more hypothermic.
Breaking this cycle requires aggressive temperature management. A quality emergency thermal blanket — the heavy duty aluminized mylar type, not the cheap foil squares — packed inside or attached to your IFAK provides the capability to wrap a trauma patient and retain body heat during the critical period between injury and care. This is a frequently overlooked IFAK component that pays significant dividends in extended care scenarios.
Where Your IFAK Must Be
The best stocked IFAK in the world is completely useless if the person trying to save you cannot reach it in the critical minutes after you go down.
This is not a hypothetical consideration. It is a documented cause of preventable trauma death — equipment that existed and was adequate to treat the injury but was inaccessible to the rescuer in the time available.
Your IFAK must be on your body — not in your pack, not in your vehicle, not in your house if you are away from it. On your body. Always. Mount it on your belt, your plate carrier, or an ankle rig depending on your operational context and clothing. The specific location matters less than two requirements — it is on your body, and it is in a standardized, predictable location that any person who knows your system can locate with either hand regardless of how you fall, what position you are in when you go down, or whether it is dark.
This is why standardization matters as much as the content of the kit. In the 160th Special Operations Aviation Regiment we operated by SOPs — Standard Operating Procedures — for every piece of equipment. Your buddy does not need to ask you where your kit is because your kit is always in the same place. In the dark. Under fire. On a moving aircraft. The kit is always in the same place and your buddy knows exactly where that place is.
Your primary tourniquet and your trauma shears must not be inside the pouch. They must be staged on the outside of the kit — secured with rubber bands, in a dedicated external holder, or mounted separately in a standardized location — where any person can rip them free and apply them in under five seconds without opening anything.
Seconds count. Every second your rescuer spends fighting a zipper, a buckle, or a cluttered kit interior is a second your blood pressure is dropping. Design your system so that the intervention time between your buddy reaching your kit and having a tourniquet on your limb is measured in seconds — not minutes.
The Training Requirement — The Most Important Section in This Guide
Everything else in this guide is about gear. This section is about what makes the gear work — and what makes it dangerous when it does not.
Carrying medical gear you are not trained to use is not preparedness. It is dangerous false confidence that creates the illusion of capability where none exists — and that illusion will get someone killed.
A tourniquet applied too close to the wound does not occlude the right vessel. A tourniquet applied without sufficient tension does not stop the arterial bleed. Hemostatic gauze packed loosely without adequate sustained pressure does not activate properly. A chest seal applied to skin that has not been dried does not seal. And a needle pushed into the wrong anatomical location does not decompress a tension pneumothorax — it creates a new and potentially fatal injury.
In a true SHTF scenario — the scenario this guide is written for — you are the medical system. There is no backup. There is no higher level of care to hand off to in the immediate term. The quality of your training, the currency of your skills, and the depth of your clinical judgment are the only variables that determine whether your gear saves a life or makes things worse.
The gear is hardware. Your training is the software. Without the software the hardware does not function.
The minimum training requirement to carry the basic components of the IFAK described in this guide — tourniquets, wound packing, chest seals — is a Stop the Bleed course. This is a two hour hands-on program developed by the American College of Surgeons and available through hospitals, fire departments, and community organizations across the country. It covers tourniquet application and wound packing with hands-on practice. It is the absolute floor — the minimum viable training for the minimum viable IFAK.
To carry and competently use the full kit described in this guide — including junctional tourniquets and chest seals — you need a Tactical Combat Casualty Care course or equivalent civilian trauma training. TCCC courses are available through military affiliated training organizations, tactical medical schools, and civilian preparedness training providers. They typically run one to two days of intensive hands-on training covering all TCCC interventions with supervised practice.
For needle decompression capability specifically — the training requirement is formal medical training with supervised hands-on practice, ongoing proficiency maintenance, and the clinical judgment that only comes from sustained training and practice over time. A single TCCC course does not provide this. Ongoing engagement with medical training does.
Train with your training gear. Know your kit by feel in total darkness. Practice every intervention until the muscle memory is encoded — because under the stress of a real emergency your fine motor skills will be compromised, your working memory will be reduced, and the only thing that will guide you through the intervention is the muscle memory built through repetitive practice before the emergency started.
Build your kit to match your training level. As your training advances your kit advances. A well-trained person with a tourniquet and a pressure dressing will save more lives than an untrained person with a full advanced trauma kit they cannot deploy correctly. Your skill is always the limiting factor — never the gear.
IFAK Care and Maintenance
A preparedness kit is only as good as its current condition. A tourniquet with a degraded windlass mechanism from improper storage fails at application. Hemostatic gauze past its expiration date may not activate correctly. Chest seals with compromised adhesive do not seal. Gloves with micro-tears provide no protection.
Inspect your IFAK on a regular schedule — at minimum every six months, ideally quarterly. Check expiration dates on all consumable items — hemostatic gauze, chest seals, and gloves all have expiration dates that matter. Inspect tourniquets for windlass mechanism integrity, strap condition, and buckle function. Inspect chest seals for packaging integrity and adhesive condition. Replace anything that is expired, damaged, or of uncertain condition.
Rotate your training items on the same schedule. Your training tourniquet accumulates wear from repeated application — replace it when the mechanism shows degradation. Your training needles should be replaced as used.
Store your IFAK away from extreme heat. High temperatures degrade adhesives, compromise packaging integrity, and can affect the stability of hemostatic agents. A kit stored in a vehicle in a hot climate needs more frequent inspection than one stored in a climate-controlled environment.
The Four Rules of a Properly Built IFAK
Let's bring this home. A properly built and deployed IFAK for true SHTF scenarios follows four non-negotiable rules.
One — your IFAK is for life-threatening trauma only in situations where professional medical care is unavailable. Keep it lean, organized, and memorized so your buddy can work fast without guesswork.
Two — it must contain the core components to address the big three killers — massive hemorrhage, chest trauma, and shock. Real TCCC approved tourniquets and junctional tourniquet capability, hemostatic gauze and pressure dressings, chest seals, hypothermia prevention, trauma shears, and gloves. For trained and certified individuals with maintained proficiency only — needle decompression capability.
Three — it must be on your body in a standardized, predictable location accessible by anyone with either hand in any body position. Primary tourniquet and trauma shears staged externally.
Four — your skills must always exceed your gear. If you are not trained, certified, and maintaining ongoing proficiency with an item — it does not belong in your kit. Build the kit that matches your training, not the kit that exceeds it.
A Final Word on Context
This guide describes doctrine for the worst case scenario — the true SHTF event where normal systems have failed completely and professional medical care is genuinely unavailable. That context is real, it is worth preparing for, and it demands serious preparation.
It does not describe everyday life. In everyday life call 911. Get to a hospital. Use the professional medical system that exists to provide exactly the care that IFAK doctrine attempts to substitute for in its absence.
The difference between a prepared person and a reckless one is not the gear they carry — it is whether they understand the context in which that gear is appropriate, whether they have the training to use it correctly, and whether they have the judgment to know when the situation calls for improvisation and when it calls for deference to a higher level of care.
Prepare for the worst. Seek professional care in every situation where it is available. And never confuse carrying a kit with having the capability to use it.
Go Check Your IFAK Right Now
Pull it out. Does it follow these four rules? Is it lean and focused or is it a junk drawer? Is it on your body or buried in your pack? Are your tourniquet and shears staged externally? Do you have certified, maintained training for everything inside it? Are the expiration dates current?
If the answer to any of those questions is no — fix it today. Not this weekend. Not next month. Today.
Your life or the life of someone you love will depend on the decisions you make right now before the emergency starts.
Go Deeper with the Total Preparedness Program
This blog post covers the foundation. The Total Preparedness Program goes ten levels deeper.
Grid down medicine, trauma care, alternative medicine for when the pharmacy is closed, city survival guides for dozens of major cities with new cities added every week, land navigation, bug out doctrine, firearms mastery, food and water security, K9 field medicine, environmental survival, infant and family medical readiness, women's health, defensive operations, and more — hundreds of modules built by a combat Flight Medic, ICU Nurse, and Family Nurse Practitioner with two combat deployments and decades of real clinical experience.
This is not theory. This is experience.
Enroll today at tpp.suburbanprepper.com
This is survival. This is resilience. This is preparedness.
